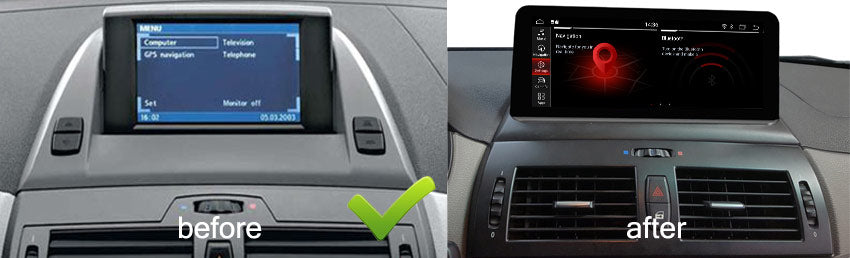
PS:
A, 2-Feb, 2024, the last day for the order & payment (If order in stock)B, 4-Feb,2024 is the last day for shipping.
C, 19 -Feb,2024 back to the office, stock inventory, no shipping!
During holidays, you can contact us by email (sales@hifimax.net), WeChat or WhatsApp: +86-13544949609 (PAUL), but no shopping, can not arrange any new orders, some technology support (software support) might stops, because engineer are on holiday. Sorry for the inconvenience!
If you really interest to order the products, please handle it ASAP.
Thank you very much!
Paul Nong
Hifimax Industrial Limited (China) - since 2006
Email: sales@hifimax.net
Tel: (86)-0756-2220505
Mobile:+86-13544949609 (Wechat/ WhatsApp)
https://www.hifimax.net (since 2006)
https://hifimaxnavi.com (For BMW)
https://hifimaxgps.com (For Audi / Mercedes)
https://www.youtube.com/HifimaxIndustrial
https://www.facebook.com/Hifimax
(1) The model including CIC, NBT, EVO BMW MMI Carplay box support the upgrade. This is the products link: click here.
(2) Before upgrade, please check: if your car with OEM Bluetooth? if not, it not support. If your car is CCC model, it not support (CCC model: the audio transfer through AUX)
(3) If your model ordered from other supplier, it NOT support, different products, the software is different, you can not use our software to upgrade other seller's products, if any problems, don't claim to us.
(1) For now, the version : v3.6.0.14 support this function.
There are 3 different softwares (for CIC, NBT, EVO), you need to choose the correct version for your model.
(2) The software as below list (Download the right version for your model):
CIC:
version: lycichl_3clientv3.6.0.14.ly.c.hl (with "hl" in the end of file is for CIC).
Click here to download it
-----------------------------------------------------------
NBT:
version 1: lybmw_3clientv3.6.0.14.ly.b
Click here to download it
version 2: lybmw2e_3clientv3.6.0.14.ly.b2
Click here to download it
PS: The version with "b" or "b2" (in the end of file) is for NBT,
What is the difference? read below info.
-----------------------------------------------------------------
EVO:
version: lyevoe_3clientv3.6.0.14.lye.e (with"e" in the end of file is for EVO)
Click here to download it
-----------------------------------------------------------------
(3) Why NBT have two versions, how to identify it?
The version 1 with a "b" is older version;
The version 2 with "b2" is newer version.
You can check: What kind of original version your models contains?
For example, below is the software version from one of NBT CarPlay box,
The software verion (CUST Version: v3.6.0.13.ly.b2) have "b2" in the end of file,
in this case, download the verison 2 (lybmw2e_3clientv3.6.0.14.ly.b2)
to upgrade it.
PS: If the original version contains a "b"(in the end of file) only, then download version 1 (with a "b" in the end of file) and upgrade it.
(4) Do I need to upgrade the MCU or other software?
no, don't need it, just upgrade the software mentioned above only, the MCU keep it same as original.
(1) Prepare a U-disk(USB drive), better less than 8GB, format FAT32
(2) Download the software, you need to decompress the zip file(unzip the file),
will see two files inside (GEMINI_PACK.BIN & ISPBOOOT.BIN), copy this two files
to the root of USB drive.
(3) Connect to USB of MMI Carplay BOX.
(4) Go to Carplay box menu: click "setup"/software update/ input the password 2916 / click "system update"/ it pop up a "User update via USB", click "V" to confirm it/ it will update automatically, notice: don't power off the car during update, you should keep car engine power on, it will take few minutes for the update. after it finish the update , it pop up "burn success,welcome", it will restart the unit automatically, after that, you can remove the USB drive.
(5) After update, you can go to "Setup"/software version, to check if the version changed or not.
Video demo
Go to "setup" , and turn on " Use Car BT channel", and connect the phone to Carplay (or Android Auto), also connect the phone to OEM Bluetooth at the same time, you will access to original interface, choose "multimedia/external device/ choose "Bluetooth" (instead of AUX). Then will be fine.
There are tons of different BMW MMI Carplay box in the market, from our point of view,
(1) If the Carplay box have better sound quality, that is very important, since you might play the music everyday; (2) Also, if the CarPlay Box can use OEM microphone for phone calls, it also extremely important. We read tons of reviews from different platforms like Amazon, ebay, aliexpress etc, most of buyer claim this two issue.
Fortunately, both our CIC NBT EVO models can use OEM MIC and now, that also support Bluetooth for audio transfer. Order the BMW CarPlay box from this link with confident today! https://hifimaxnavi.com/products/apple-carplay-android-auto-for-bmw-1-7-series-x1-x3-x4-x5-x6
After download it, unzip it as below
Inside of the "mylogo12", there are 3 folders
PS:
(1) Folder "1280_480" , there is picture name "logo_102", format is "BMP" , resolution:1280*480;
(2) Folder "1920_720" , there is picture name "logo_102", format is "BMP" , resolution:1920*720;
(3) Folder"thumbnail", there is a picture name"logo_102", with "PNG" format,
the resolution is 240*140.
(1) After changed the pictures inside, then compress the "mylogo12" folder in "zip"format, Do NOT compress it as "RAR" file.
(2) The zip file should contains one folder named“mylogo12" only, if you have
an other folder also named "mylogo12" inside, that is wrong.
(3) The zip file with name as "mylogo12.zip"is only for Android 12 model only.
If the android 11 model, it not support. If your Android screen from other sellers, it might not work, since it might have different software versions.
]]>
PS:
A, 11-Jan, 2023, the last day for the order & payment (If order in stock)B, 13-Jan,2023 is the last day for shipping.
C, 30 -Jan,2023 back to the office, stock inventory, no shipping!
During holidays, you can contact us by email (sales@hifimax.net), WeChat or WhatsApp: +86-13544949609 (PAUL), but no shopping, can not arrange any new orders, some technology support might stops, because engineer on holiday. Sorry for the inconvenience!
If you really interest to order the products, please handle it ASAP.
Thank you very much!
Paul Nong
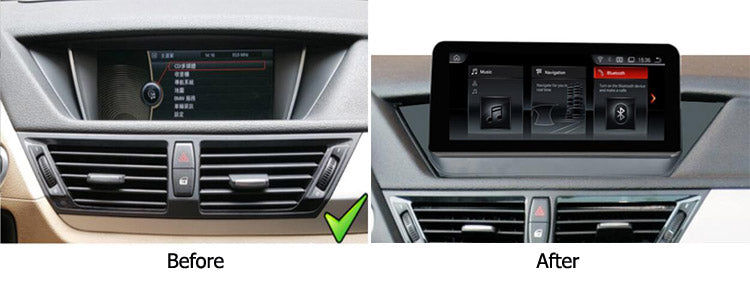
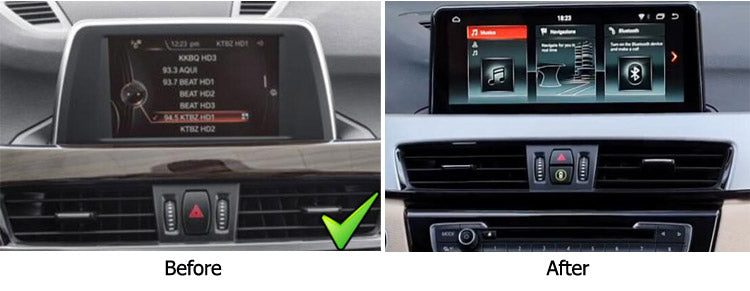
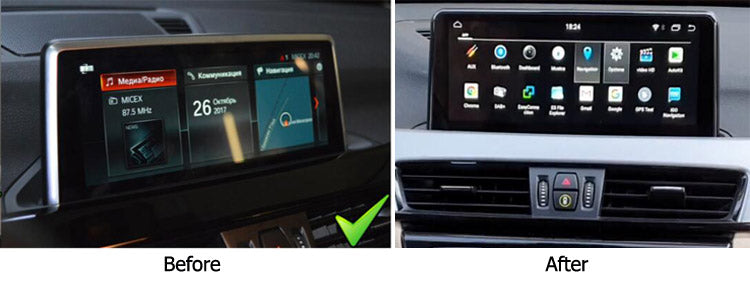
This acticle is the guide to upgrade the firmware and add the latest BMW ID8 (BMW iDrive 8) style menu to old Android 11 models. Please so kind to read this blog post carefully before operation.
1) For now, only the Android 11 model (snapdragon 662) can be upgraded with ID8 menu. The Android 11 model can be identify via it's system info
(the path is : settings/ system info).
Remark:
"Ksw" is the code of R&D company (software developer & core board supplier).
"ALS" is the product code, all our products with this code, other seller's products with different product code.
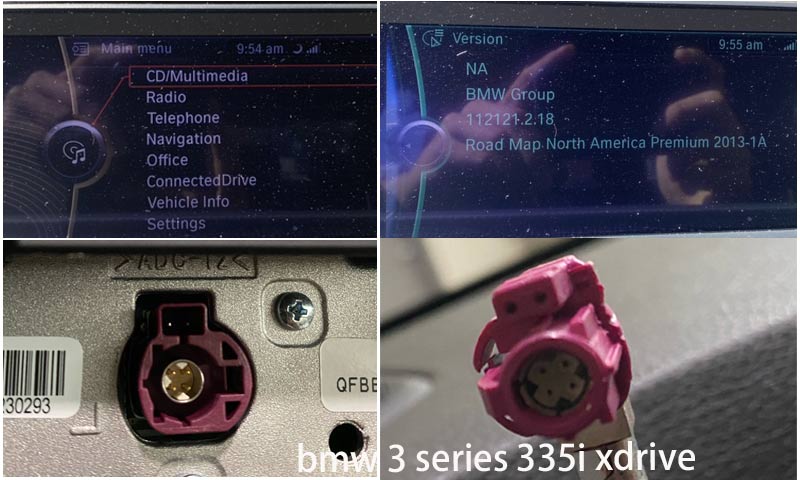
"CIC" (example), is the iDrive version for your car, you can identify the "OEM " type by checking this info (about "OEM", will talk in details as below content)
"v1.8.9" is the current software OS version, for now, it need to update the software to 2.4.2, then can add the ID8 menu.
"11-662", it means your android screen is base on "Android 11, using snapdragon 662 CPU", it support to add ID8 menu.
2) For the Android 10 model (snapdragon 625, 8953) or PX6 model (android 8.1/9) , since it's hardware is different, it can NOT be upgraded, they not support.
3) If you bought the unit from other sellers (can identify by product code "ALS"), we NOT recommend using our software to update it, because your unit might be different, it might harmful to your Android system, we don't take any responsibility for the trouble you might have (if you keep doing that) ,
You should contact your seller and get the correct software for your unit.
Double check and make sure your model is Android 11 model (snapdragon 662), please notice, the version 2.4.2 is support ID8 menu (in the future, might upgrade to other newer version), thus, the target is to update the firmware to 2.4.2 os, but please notice important tips:
(1) If your original version is lower than 1.4.5 OS (such as 1.4.0), you should upgrade the firmware to 1.4.5 first, after that, update to 2.2.3 OS, finally update to 2.4.2 version.
(2) If your original version is 1.4.5, or above this version (for example, 1.4.5 or 1.5.3), you need update it to 2.2.3 first, after that, finally update to 2.4.2 version.
(3) After update to 2.4.2, the ID8 will NOT shown in the in the factory setup menu, It need you to update the "OEM" firmware.
Android 2.2.3 package (1.55GB): Ksw-R-M600_OS_v2.2.3-ota (Download)
Android 2.4.2 package (1.58GB): Ksw-R-M600_OS_v2.4.2-ota (Download)
OEM for CCC/CIC/NBT (16.2KB), (Download)
OEM for EVO (15.0KB) (Download)
(Note: For now, the latest OS is 2.4.2, we will continue to update with latest version, thus, the link might be changed if need)
Here just make an example, if your unit is Android OS : 1.8.9, according to above instruction, you should upgrade the firmware to 2.2.3 first, after that, continue to update it to 2.4.2.
Update Steps:
(1) Download the firmware (Q3 as montioned above)
(2) Prepare a U-disk (Better less than 8GB, format FAT32).
(3) Copy the " Ksw-R-M600_OS_v2.2.3-ota" (a zipper, do NOT unzip it, just copy the package you download) , and put it to the ROOT of U-disk.
(4) Connect the U-disk to USB from Android screen ( make sure the car engine is power on during update)
(5) Just wait few seconds, the windows will pop up a message:
You click " yes", then it will start to update the software itself, the update need about 4-7 mintues, it has a progress bar to show the update process, after update, it will restart the android screen, after that, you can remove the U-disk from the USB, then will be ok.
5) After the update, you can go to the settings, and click "system info", then will see the new OS version (2.2.3). then continue update it to Android 2.4.2 OS by using "Ksw-R-M600_OS_v2.4.2-ota" . The update steps are ALL the same).
Tips:
1, If you use TF card (micro-SD card) to load the software, we recommend use Class 10 type Micro-SD, to ensure the speed of files transfer when update it.
2, During update, you should keep car engine power on.
Warning:
During the software updating, it CAN NOT power off the car engine, can not cut off the power, if not, it might big trouble and make it death...you should know and afford this risk on your own, we don't have any responsibility on this.
The "OEM" is very small software, it just need few seconds when update it.
But you need to notice two points:
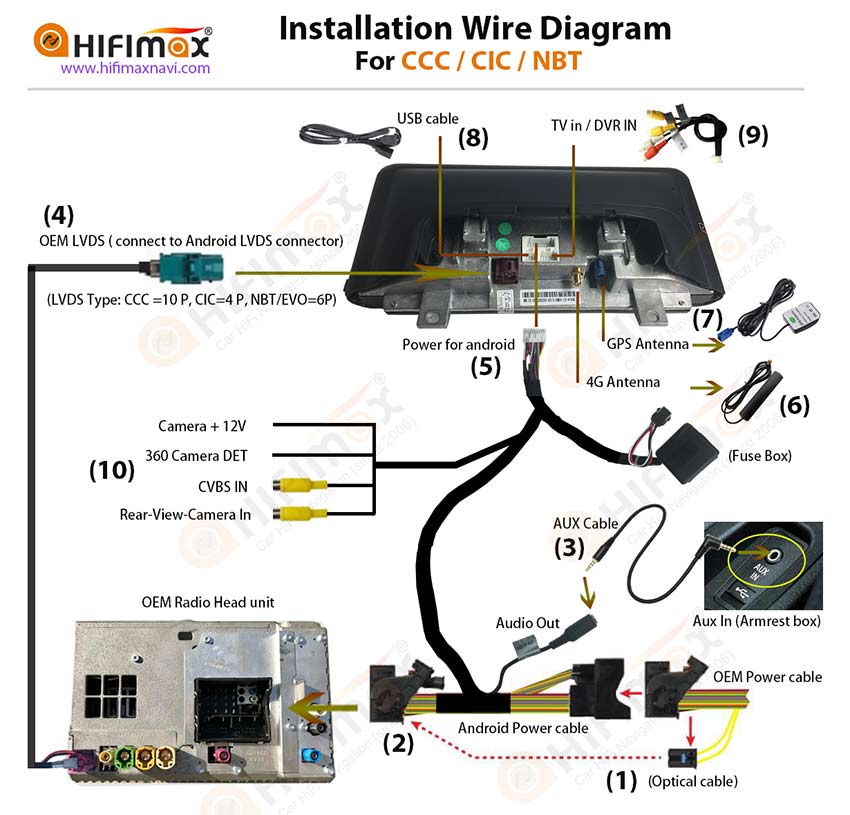
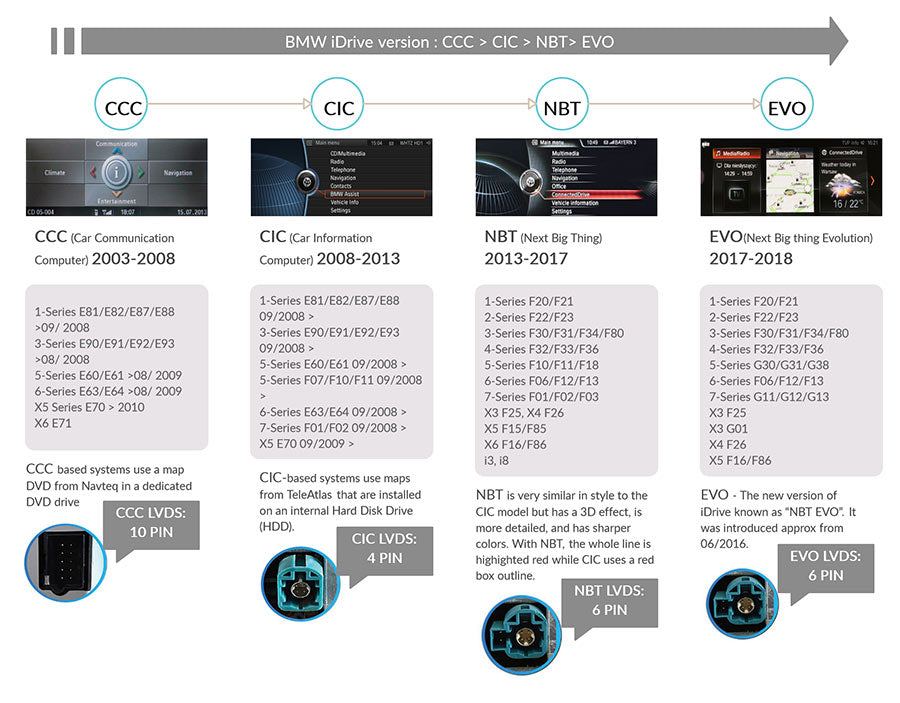
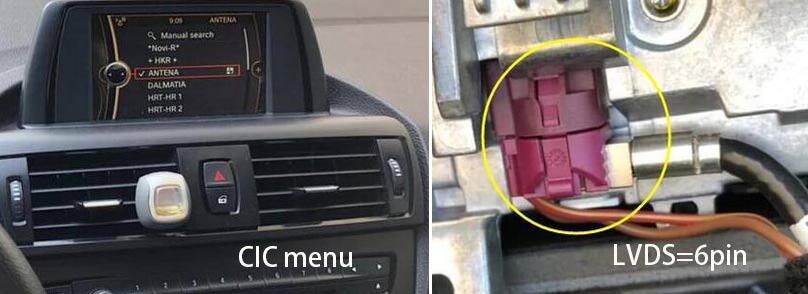
(1) There are two kind of "OEM" files, one is for CCC/CIC/NBT car types; an other one is for EVO car type. If you don't know what is CCC/CIC/NBT & EVO? please click here.
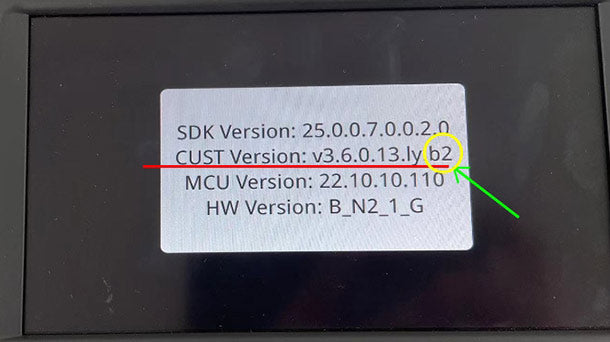
An other way to identify the "OEM " type is by checking "system info".
For example, if the MCU version show "NBT", it means your car is NBT iDrive system, then you should choose " OEM file (for CCC/CIC/NBT)(16.2KB), all CCC, CIC, NBT are using the same OEM file.
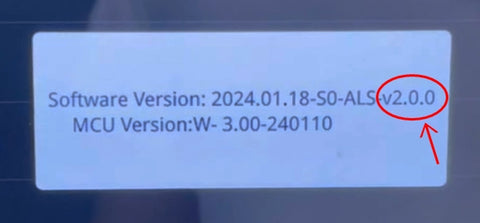
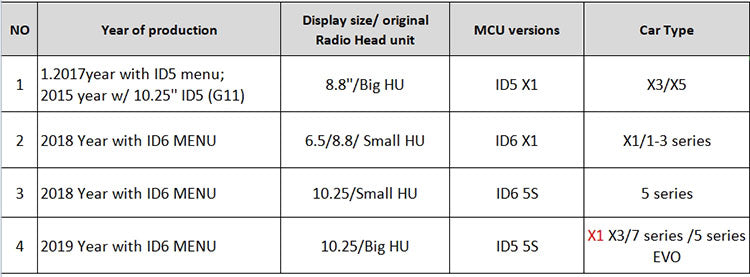
For EVO, The latest EVO model, it just show "EVO" on MCU version,
But some old EVO model, they will show these format: "ID5 X1", "ID6 X1", "ID6 5S" "ID5 5S", as you know, the ID5 or ID6 are belong to EVO, so, choose OEM file (for EVO) (15.0KB).
(2) After download the "OEM" (zip file), it need to unzip the file (decompress it),
This is different to the App firmware (2.2.3 / 2.4.2), after unzip it, you will see a folder name "OEM", inside is " factory_config.xml". you should copy the folder "OEM" to the root of U-disk.
The correct is (inside of the U disk, it just ONLY ONE folder named "OEM"), The patch should be :
U-disk: OEM/ factory_config.xml
All below 4 case are mistake (a lot of friends made mistake):
(NO.1 has two folder; NO.2 is unzip the file, NO.3 is the firmware in the root of U-disk, NO.4 is copy the folder we named, all these case, system can not detect and read it)
U-disk: OEM/OEM/ factory_config.xml
U-disk: OEM.rar
U-disk: factory_config.xml
U-disk:OEM- for EVO/OEM/factory_config.xml
Some friends might need support when update the firmware, if you are HIFIMAX customer, you can send us the email directly, tell us your order number
(it is need).All HIFIMAX customers enjoy free firmware update and life-time email or online supports.
If you bought the products from other reseller / dealer / distributor, we reserve the rights when offer the service, we suggest you to check with your sellfer directly. We dislike to jump over our cooperated dealer and talk with their customers directly.
Recently, the MCU software have changed, it Integrated 4 MCU to 1 MCU package. that way, you are no need to ask us to send the MCU one by one, just make a setting in factory setup menu, then will be fine.
(Notice: if your models is NBT, CIC, CCC or the car without original display, no need to set it like that, keep default setting would be fine)
First, access to the factory setup menu as above.
The factory setup path is : settings> factory, the factory password is : 070305.
Second, please check the list as below:
Please read "FAQs" to understand it correctly.
It is your original BMW iDrive menu style, both ID5 & ID6 are belong to EVO system, but they are different version, thus, MCU is different. so, you should know which one your car contains.
The size of factory/ original display for your car, the car with 6.5 inch screen & 8.8 inch or 10.25 inch display are different on the screen parameter, since they have different screen resolution. thus, as car owner, you should know which screen size of your original display.
Please notice: the year of production on the list is just for reference only.
For example, if your car is 2018 year with ID6 menu style, the original radio is "small HU" (small head unit), the original display size is 6.5 inch, then you should choose "ID6 X1" as MCU (NO.2)
But if your car is BIG radio head unit (big HU), then you should choose ID5 5S (ignore the year of production or other aspects), the radio head unit type (small HU or Big HU) is in priority.
Video Demo:
After you choose the CAN setting (MCU), you have to wait about 30 seconds, then power off the unit, it means: power off the car, lock the door, that way, the power will disconnect completely, after that, wait about 1 mintue, then open the door and power on again. that way, the CAN system will restart.
]]>Note: If your car installed the BMW Carplay module (keep original BMW display, instead of Android OS screen), this guide is not fit for your case.
We took the "Zlink" App (Built-in Apple Carplay/ Android Auto) as an example.
To connect the "Zlink" via wireless connection, it quest to pair the Bluetooth of Android screen, thus, it need to set the "Android Bluetooth" to "ON"
in the factory setup menu.
To use the Apple Carplay, you must make sure the "Bluetooth" & "Wi-Fi" is always "ON".
(1) If you can not pair the Bluetooth, you can delete some history paird records from the phone / android screen, then try it again. can rebooth the phone/android screen if necessary.
(2) After paired the Bluetooth, it will switch to Apple Carplay automatically. If it connected the Bluetooth, but it don't switch to Carplay automatically, it show "connecting" always in the menu and not access to Carplay menu.
Please check your phone: under the "Bluetooth", if it has too much bluetooth records, you can delete some useless Bluetooth records, and try it again.
also, notice the cellphone can not connected to two or more Bluetooth device at the same time. Please check below video for more details.
The Apple Carplay is base on Bluetooth technology, it NOT allow to use Bluetooth at the same time. No matter that is OEM (original) Bluetooth, or Android Bluetooth, you should disconnect it if you decide to use Apple Carplay. To make sure your phone is just connect to Carplay ONLY.
If your phone connected to Bluetooth, at the same time, it connected to Apple Carplay, it might have " no sound" problem, or it is hard to connect it.
You can turn off the OEM Bluetooth in factory car menu, make it "deactivated"
or can remove the car Bluetooth 's name in the cellphone by "forget this device".
Some friends claim " no sound" problems when he using the Apple Carplay. it might have several reasons:
As mentioned above, the Carplay not allow to use Bluetooth at the same time.
The Apple Carplay is one of Apps of BMW Android screen, same as other Android functions, the sound work via "AUX" (CCC/CIC/NBT) or "USB/AUX" (For EVO car),thus, although your phone have connected to the Apple Carplay, but you should make sure the "AUX"/ "USB/AUX " is actived.
When making phone calls, the sound is quite low level, how to check the settings.
(1) Volume setting
(2) Android / Sound setting, set to maxium for all options.
(3) MIC gain setting (in factory setup menu), set it as 3/4.
]]>
How to choose it? What is the difference?
Yes! Apple Carplay is for iPhone (iOS), Android Auto is for Android OS phone! This 2 options support BOTH Apple Carplay and Android Auto!
For Android phone users:
If your Android Phone is new model, such as Samsung S8+, it support wireless Android Auto (check it from google's website), both built-in design and external dongle are support wireless connection. But if your Android phone is old model, it does't have wireless Android Auto, in that case, you have to connect the USB and use as Wired connection.
What other difference?
For built-in (CP/AA) , after connected to the phone, the WI-FI in Android screen will shut down, it created a wireless signal between the cellphone and android unit, thus, it not allow other device to connect android screen by Wi-Fi;
But for external dongle, after it connected, the Wi-Fi on the Android screen side still working, since after connected to CP/AA, there is a wireless connection connected between your pone and the External dongle (instead of android screen), thus, the android screen's Wi-Fi still working.
The Built-in (CP/AA) with higher intergrated with BMW/Mercedes/Audi Models, such as: the steering wheel buttons, not only volume controls, but it can pick up the phone by steering wheel button (can set it in factory setup menu). Video
https://youtu.be/yuKyh5zsBVs?si=KnbuBDPJnOOmb85B
But for external CP/AA dongle, it just look like an universal dongle, except the volume up and down, other keys in steering wheel, it not work.
Below are video demo for you:
Wireless Apple Carplay (iPhone) - External dongle
Wireless Android Auto (External dongle, new model)
Wireless Android Auto (Samsung S8+), Buit-in Android Auto:
Android 11 is the latest version released in the end of AUG - 2021, it adopt Qualcomm snapdragon 662 chip, Octa core CPU, 6GB or 8GB RAM, 128GB or 256GB internal storage, due to the cost consideration, we mainly offer 6GB +128GB as mass production.
What is the difference to Android 10 models? please check the comparison table as below:
Android 10 | Android 11 | |
CPU | Qualcomm Snapdragon 625(MSM8953) 8-core CPU (8*A53) |
Qualcomm Snapdragon 662(SM6115), 8 core CPU(4*A73 + 4*A53) |
GPU | Adreno 506(650MHz) | Adreno 610(950MHz) |
Bluetooth | Bluetooth 4.1 | Bluetooth 5.0 |
Process Tech. | Samsung 14nm | Samsung 11nm |
RAM+ROM | 4GB + 64GB | 6GB + 128GB |
Carplay & Android Auto |
Apple wireless Carplay, Wired & wireless android AUTO | Apple's wired & wireless Carplay, Wired & wireless Android auto, screen mirror-link |
Split screen | Drag and drop | button operation (it is better) |
A, The "built-in " Carplay / Android Auto - Zlink, some people are complaint this function in the old Android 10 model, but in the new Android 11, it do have a great improvement on this function, it not only support wireless Carplay, also support wireless Android Auto & screen mirror link.
B, For the split screen, in the old android 10 models, the drag and drop actually very hard to operate it, but in the new Android 10, that would be very easy, hold the button, and tap it, then will be ok.
System: Android 11
Screen Resolution: 1280*480 1920*720
CPU: Qualcomm snapdragon 662(SM6115)8core Kryo 260 ,64bit processor
Kryo 260 , 4 x A73(2.0GHz)& 4 x A53( 1.8GHz )
Samsung 11 nm
GPU: Adreno 610 (950MHz)
4G:Downlink, up to 150Mbps; Uplink, Max. 75Mbps
Storage using EMCP chip,included eMMC 5.1 & LPDDR4x
eMMC 5.1 ,64GB/128GB/256GB
LPDDR4x ,4GB/6GB/8GB
WIFI: support 2.4G b/g/n ; 5G a/g/n/ac
Bluetooth: Bluetooth 5.0
SD: one SD 3.0 (Max 128GB)
USB: USB 2.0
Support Wired and wireless Carplay and android auto.
Asia/Eroupe internet info:
GSM : 850M/900M/1800M
WCDMA :B1/B5/B8
TDD-LTE:B38/B39/B40/B41
FDD-LTE:B1/B3/B5/B7/B8/B20/B28(B28A,B28B)
1, My order is Android 10 model, can I upgrade to Android 11?
Answer: No, it can not upgrade to Android 11 if your model is android 10 or older version. The Android 11 is complete new generation products, the hardware is totally different, such as CPU, Bluetooth, etc, all are not the same.
2, What is difference between the HIFIMAX Android 11 model and the models from other sellers?
Answer: In fact, we don't want to make a comment or reviews to other sellers who sell the models on Aliexpress, or Ebay or Amazon, if you like to know what is the special features on our products, please read below page:
https://hifimaxnavi.com/blogs/news/difference-between-hifimax-bmw-android-screen-and-others
Also can watch the video:
]]>
Check the video demo for wire-connection
1, Plug and play power harness
2, LVDS: Video cable for BMW EVO Apple Carplay
3, USB-AUX adapter: it transfer the audio to BMW OEM sound system.
4, Wi-Fi antenna: Wi-Fi antenna for Apple Carplay, please notice, DO NOT attach it to metal when install it.
5, AV/USB cable:
(1) Move the optical cable to new harness (if your original power harness contains optical fiber cable (2 green cable), so that the optical cable can continue to work as before. Important!
How to move the optical cable? Watch the video:
https://youtu.be/fJLT4Og8myg
(2) Audio connection
For BMW EVO car type, the audio transfer via USB, thus, it need to connect the USB-AUX audio adapter. It need to connect the Audio cable to USB port in armrest box.
(3) Microphone (optional)
The MIC (Microphone) is optional for installation, usually, it using original MIC.
(Set the “7” as OFF In Toggle switch settings).
(4) Connect Wi-Fi antenna
Connect Wi-Fi antenna for Apple Carplay, please notice, connect it to the plastic parts or materials, DO NOT connect it to metal.
(5) USB / RCA cable connection.
The RCA cable offer connectors for backup camera, when install the aftermarket backup camera, you should get the power (for camera) from this harness (instead of connecting to reverse light), important!
(7),(8) LVDS connection
Make sure the LVDS cable connected in the right way, if wrong connection, there is no picture on the display. Please refer to wire-diagram & video demo.
(9) Toggle switch settings (important)
Q1: I don’t have sound when I connect Carplay, what can I do?
A: 1) Check the fiber cable as mentioned above.
2) Set AUX on OEM system: access to original car menu, choose "AUX-USB" and ajust the volume for AUX/USB (Because the audio go through factory USB, thus, it need to active the AUX/USB function)
3) If there is no sound after step1/2, check USB-AUX cable to USB port of armrest box.
Q2, I can't connect wireless Carplay automatically, what can I do?
1) Please confirm if you turn on wifi and connect carplay's bluetooth.
2) If your car has OEM bluetooth, please delete the connection record, then reconnect carplay's bluetooth.
3) Please confirm the wifi antenna is away from metal.
4) Please confirm all siri permissions are allowed(Fig.1).
5) Reset the connection records on the phone and car (Fig.2) simultaneously, then reconnect.
Q3: How to connect reverse camera?
1) Connect the reverse camera to CVBS OUT labeled 'Reverse camera'
2) Connect the cable labeled '12V reverse camera(yellow)' to camera power
3) Setting → Reverse → Reverse camera → Aftermarket
]]>
Below is the video demo for wire-connection
https://hifimaxnavi.com/products/apple-carplay-android-auto-for-bmw-1-7-series-x1-x3-x4-x5-x6
1, LVDS: Video cable for BMW CIC Apple Carplay, 1 x LVDS-IN,1 x LVDS-OUT.
2, Wi-Fi antenna: Wi-Fi antenna for Apple Carplay, please notice, connect it to the plastic parts or materials, DO NOT connect it to metal.
3, AV/USB cable: It offer the power for backup camera and camera video input, when install the aftermarket backup camera, you should connect the power (for camera) to this harness (instead of connecting to reverse lamp), important!
4, Can Cable (power cable): Plug and play power cable.
5, iDrive Cable: offer both 4pin and 10 pins connectors.
6, Aftermarket Microphone: Offer this MIC just in case for some car types without original microphone.
7, MIC adapter cable (For OEM MIC): When the car with original MIC, to make the Carplay box compatible with original MIC, it need to transfer the connector by using this adapter.
When using the OEM MIC, then no need to connect the aftermarket MIC as mentioned above.
(1) Move the optical cable to new harness (if your original power harness contains optical fiber cable (2 green cable), so that the optical cable can continue to work as before. Important!
How to move the optical cable? Watch the video:
https://youtu.be/fJLT4Og8myg
(2)/(3) LVDS connection
Make sure the LVDS cable connected in the right way, if wrong connection, there is no picture on the display. Please refer to wire-diagram & video demo.
(4) Low CAN / High CAN connector.
The BMW CIC Carplay box offer low CAN & High CAN connector, most car types is low CAN, thus, when we send the order, it connect to low CAN connector, but if you find that is not work, you can switch it to High CAN, usually, the X3, X5 etc, it is High CAN.
(5) Connect the audio cable to AUX-IN port in armrest box.
The sound (for Carplay) transfer through the AUX to BMW original sound system, thus, for some cars, it need to connect the audio cable.
(6) Microphone & connections:
How to connect MIC when the car with OEM MIC?
1) Connect A to C.
2) Unplug blue connectors and place mic tap cable in between the connector with microphone on it and the main wiring harness coming from the roof.(B/D need to be connected)
3) When using OEM MIC, you should set the pin "7" to "FF"
(Check the toggle switch settings), and restart.
If the car without OEM MIC? How to connect it ?
1)Connect A with C, B with D.
2) Set pin7 to ON, and restart
(7) iDrive Connection
The BMW CIC has two different iDrive connectors: one is 4 pin, another is 10 pin, our harness offer both 4pin & 10 pin connectors, so, it can work with two different iDrive.
For example, below iDrive contains 4 pin iDrive connector,
remove it from iDrive knob. How to connect it?
1) , Connect original 4 pin (female) connector to Carplay 4 pin (male) connector;
2) Connect Carplay 4 pin (female) to original 4 pin (male) connector
on iDrive knob
When it is 10 pins connector, the wire connection are in the same way.
(8) Toggle switch
Toggle switch setting is very important, please check below photo, the original 6.5 inch display and 8.8/12.2 inch display with different settings.
also, when using OEM MIC and aftermarket MIC, the pin "7" is not the same.
Q1: I don’t have sound when I connect carplay, what can I do?
A: 1) Connect fiber cable as mentioned above.
2) Set AUX on OEM system: access to original car menu, choose "AUX" and ajust the volume for AUX (Because the audio go through factory AUX, thus, it need to active the AUX function)
3) If there is no sound after step1/2, connect AUX cable to AUX port of armrest box.
Q2, I can't connect wireless Carplay automatically, what can I do?
1) Please confirm if you turn on wifi and connect carplay's bluetooth.
2) If your car has OEM bluetooth, please delete the connection record, then reconnect carplay's bluetooth.
3) Please confirm the wifi antenna is away from metal.
4) Please confirm all siri permissions are allowed(Fig.1).
5) Reset the connection records on the phone and car (Fig.2) simultaneously, then reconnect.
Q3: How ro connect reverse camera?
1) Connect the reverse camera to CVBS OUT labeled 'Reverse camera'
2) Connect the cable labeled '12V reverse camera(yellow)' to camera power
3) Setting → Reverse → Reverse camera → Aftermarket
More questions? Please check the User manual here:
https://mega.nz/file/vk5E0Aob#rZYCPaZ6H5PDVB8OX0MAWmmCOqU4lL_OUOaZqRqPTj4
]]>
PS:
A, 3 - February would be the last day for the order, if products with stock.
(Due to the car compatibility checking and different time zone reason, if the order can not confirm before 3 - Feb, then the order will ship after our holiday)
B, 5 - February is the last day for shipping
C, 20 - February back to the office, stock inventory, no shipping!
D, 21 - February, shipping is ok.
If you really interest to order the products, please handle it ASAP.
Thank you very much!
Comparison | BMW Android screen | BMW APPLE Carplay (Android Auto) |
Display | 8.8''/ 10.25'' new android screen | 6.5'' 8.8'' 10.25'' OEM screen |
Keep OEM Radio features? | YES | YES |
Steering wheel controls | YES | YES |
IDrive knob operation | YES | YES |
Car compatibility (CCC) | YES | NO |
Car compatibility (CIC) | YES | Some of CIC is compatible |
Car compatibility (NBT) | YES | YES |
Car compatibility (EVO) | YES | Some of EVO is compatible |
Apple Carplay(Android Auto) | Optional (extra cost: about $30 - $45) | YES |
Can install App? | Can install APPs, Google map, waze, spotify etc | NO |
Wi-Fi / 4G network | Built-in Wi-Fi, Support 4G LTE (Qualcomm model) | NO |
Touch screen operation | YES (in android menu, OEM menu work through iDrive) | NO |
Installation | Plug and play | Plug and play |
Price (budget) in USD | USD400 + | USD250 ~ USD300 (HIFIMAX) |
From the above comparsion list, we know that BMW Apple Carplay interface with lower budget, it is plug and play, easy install, keep original display,can operate by steering wheel, idrive, support all OEM radio features, thus, a lot of
friends instereted in this kind of upgrade.
But the touch screen is not available, also there is no internet connection, thus, it can not download the apps from play store or android market. Also, some of BMW car types are not compatible. Such as CCC and some of CIC / EVO model, we not recommend this kit
Compare to BMW Apple Carplay(Android Auto) interface, to replace with 8.8 inch or 10.25-inch android screen is much more popular nowadays. It comes with a much bigger display and higher resolution(up to 1920* 720), all android screen is highly customized and look similar OEM display, you never feel that is a cheap android tablet in the car, In contrary, all android screen we offered are using premium materials, such as the LCD display, it comes from LG brand with high screen brightness.
All android screen built-in Wi-Fi, thus, you can connect the android screen to your phone via hotspot, that is easy for internet connection (For Qualcomm model, it is built-in 4G LTE, thus, you can buy a SIM card in your side, and keep internet connection everywhere, anytime).
The internet connection is quite important for a BMW android screen because, with the internet, you can update the navigation map anytime, anywhere, keep the latest navigation map will make you feel relieved during the journey.
Once more, the android screen enables you to download and install tons of Apps, like Spotify, Facebook, Youtube, or some online TV program, etc. This enable you enjoy the HD TV or video during long journey.
]]>
If your car is original BMW EVO system, the wire connection is different, please click here.
The install manual above let you have a general idea for the installation. For some steps, if you not so clear of it, Please click here to read more details.
(or just use the phone to scan the QR code below)
(1) Cut off the power before install the android screen (for safty and avoid accident) .
(2) Test all functions before recover the dashboard, to avoid open the dashboard
once again
(3) If you ask other installer to install it for you, you still have a general idea for the installation, and know how to test the functions.
]]>
If your car is original BMW CCC, CIC, NBT system, the wire connection is different, please click here.
The old power harness is easier to install it, since it transfer the audio on the back of radio head unit. But some EVO cars with special USB cable, the old power harness can not compatible with it, the screen keep flashing and without audio in speakers. To resolve this problem, it need to cut the USB and connect it again, and update the firmware, this is big trouble for new installer.
That is why to design a new harness and make it will compatible with different EVO car types, the sound quality same as the old harness, the difference is, it need to distribute the USB to the armrest box.
The install manual above let you have a general idea for the installation. For some steps, if you not so clear of it, Please click here to read more details.
For some car types, especially for the car with CIC and made in 2012~2014, the LVDS might be 4 Pin or 6 Pin, we suggest removing the original screen to check the LVDS connector.
Usually, the CIC should have 4 PIN LVDS, but in some special cars, it is 6 PIN LVDS!
Example No.1: BMW 1 Series F20 2014, menu style isCIC, the LVDS is 6 PIN.
order [B211] (with 6 Pin LVDS)
Example No.2: BMW 335i xDrive with CIC menu and 6 Pin LVDS, order [B213]
(with 6 PIN LVDS)
For these car models, if you order a wrong android screen, it can not install to the car (the LVDS connector is different). So, the best way is to remove the dashboard and check the LVDS connector, then it will 100% confirm the car compatibility.
]]>
If you searching a BMW android screen, you might confuse one question: there are so many different brands and models that look quite similar, all of them with the same appearance, same user interface, same functions, and almost the same descriptions. How to know the difference?
Such kind of " Same Models" all over eBay, Aliexpress, Amazon, and many websites, even you are experienced resellers, sometimes is also hard to tell the difference between them. Today, let me tell you how to check the difference for them.
1, The IPS normal display consists of normal glass, light rays are not absorbed.
2, The IPS anti-reflection screen is an optical glass- colors and contrasts are displayed more intensively, light rays are better absorbed compared to the standard display. Now ALL Hifimax products with this anti-reflection screen (default)
3, The Anti-glare Blue-Ray display is a matt display, it best absorbs falling light rays and is highly recommended for vehicles with a panoramic view and for Cabrio or with a sensitivity to mirrors. That is optional, cost USD35.00, click here
When you compare the price, make sure they are the same type of product.
Most friends are easy to distinguish the anti-reflection screen & the normal screen (the screen with chrome trim), the most regular question is: when
two of them are anti-reflection screen, how to check the difference between them?
If you just look at the picture as above, you will find both of them are full black screen, almost the same, for most people (even for many experienced resellers)
are not know their difference, so, please look at the photo below.
From this photo, you will find HIFIMAX BMW android screen with narrower spacing on the edge.
When you check the UI display area, you will find the HIFIMAX BMW android screen with a bigger display area than others, although they are the same screen size (10.25'' or 8.8''). You can view the UI from different view angles.
3, Bottom view
Many people now might confuse: why they have such a difference? All of them are 10.25'' display, the software is not the same? In fact, the software & display are the same, the secret is: the mold is different!
For HIFIMAX BMW android screen, between the touch screen and LCD screen, there is no gap, but other models, there is a little gap between the touch panel and LCD, such kind of gap make it different when you view the android screen with different view angle, especially for the side view.
Video Demo
]]>
This article will clarify these two questions. Click here to visit a full installation guide for the BMW android screen.
Some friends are very concerned about certain functions, such as Spotify, or Carplay. When he/she get in the car, the first thing is to check certain functions. But we suggest checking the audio & original menu in question first. Because by checking this, we can identify and confirm if the android screen installed correctly or not.
For the car with CCC/CIC/NBT/EVO original interface, just click " Car-info " to get into the original menu. If it does not show the original menu, or wrong showing on the screen, just check below two steps:
Go to the “ factory setup" menu, enter the password, click "ok". PX6 model password: 1314, Qualcomm model password: 070305.
Choose the "car type" base on your original car model. For example, your car is original CIC with 6.5'' factory screen, then choose the 4th showed as below photo. Sometimes you need to choose one by one.
How to choose it? Video demo:
If all car types do not work, check if you have well connected LVDS cable on the back of the android screen, click here: https://hifimaxnavi.com/pages/lvds-connection
The LVDS is the video cable for the original display. After you removed it from the original display, you have to connect it to the back of the android screen, so that the original radio menu can show on the new android screen.
Go to the android menu, play music or video, increase the volume. If no sound, go to the original menu, select " AUX" or " USB', or "USB/AUX source", touch the screen and back to the android menu, play a music or video, increase volume, if no sound, go next two steps.
When the car with an optical amplifier, the sound work through two optical cables, it needs to move optical cables to an android power cable.
The optical cable was connected to factory radio head unit when installing the android screen, it was removed from original radio, because the sound work through an optical cable, you have to move this two optical cable to new power cable and connect to the original car radio, so that the sound can continue to work.
A, For the car with CCC, CIC, NBT model, the sound work through AUX,
for some cars, it needs to connect the AUX cable, please visit the link here: https://hifimaxnavi.com/pages/about-aux
B, For the car with EVO interface (the car made in 2017-2018), it just have USB only, no AUX, the sound work through USB, thus, you have to double-check if you have connected it correctly.
https://hifimaxnavi.com/blogs/news/bmw-evo-head-unit-aux-to-usb-wire-diagram
Tips: For EVO model, since the sound work through USB (EVO model), thus, when you play the music in android mode, you also need to select the "USB' or "USB/AUX source" first, and back to the android mode and play the music or video.
Special case:
If you have been installed other aftermarket interface ( such as camera interface, or Carplay interface, etc), when you install the android screen, you need to remove all other aftermarket cables and connect the original car power cable to android power cable, if not, it will cause a lot of problems.
]]>
Being a BMW X1 owner, if there is a chance to upgrade the OEM BMW display to a larger screen, say 10.25-inch android screen which integrated navigation GPS + multimedia / Apple CarPlay without being void the original radio functions, would you interest to try? In this article, we will offer some tips for BMW X1 navigation retrofit.
Do all OEM BMW radio functions work after replaced with an android screen?
Yes, it supports ALL original radio functions after replaced with an android screen, the answer is definitely! Because it just replaced the OEM display ONLY, the radio (CD) head unit is still kept in the car, thus, all original functions (like iDrive, steering wheel controls, parking system, etc ) work as same as before.
How to order the right android screen for my BMW X1?
It needs to install different models of the android screen for different BMW X1 car models.
The BMW X1 made in 2009 - 2015 come from the E84 platform, some of them just contain a storage box at the top of the dashboard, no factory screen, no LVDS, no iDrive.
For this car, you should choose this model
B219, there is an after-market iDrive come with the accessories.
The BMW X1 E84 (2009-2015) with factory CIC screen is the upgraded version, it has iDrive in the car. For this car, you should install the other model: B239.
If your BMW X1 made in 2016-2017 (F48), the OEM radio head unit contains an NBT system (6 PIN LVDS), it contains an iDrive in the car. For this car, you should choose this model B209.
BMW keeps rolling out its new models, the BMW X1 F48 made in 2018 with EVO interface (LVDS is 6 Pin). Please notice, this car is different from the car made in 2016-2017 (NBT), although they look quite similar, you have to install another android screen B509.
How to retrofit & install the android screen to BMW X1?
To install the android screen to BMW X1, please click the link as below
For BMW X1 E84, please click here.
For BMW X1 F48, please click here.
The installation is easy, usually, it just needs about 20-30 minutes for an experienced installer. The wire connection totally plugs and play, no cutting the wires, no modification, no void the car warranty.
Because installation is simple and similar for all our android screen, thus we offer more details on installation, you can visit this page to check more details. If you have any doubts during installation, live video support is available if necessary.
Purchase the BMW X1 android unit from “ Serious Seller “?
There are more and more sellers selling android navigation for BMW.
However, when you decide to buy it, except the price, it needs to consider other aspects, such as: how many years did this seller in this industry? He is professional? With good communication?
We recommend buying it from " serious seller ", shopping is just the beginning, you might have more questions on installation/usage, or you might need firmware upgrade in the future, in a word, sustainable after-sale service is also important.
]]>
PX6 |
Qualcomm Snapdragon |
|
CPU processor | Rockchip RK3399 | Qualcomm Snapdragon 625 (MSM8895) |
Hexa Core (6 cores): Dual Cortex-A72(1.8GHZ)+ Quad Cortex-A53(1.4GHZ) |
Octa-Core (8 cores): 8 x Cortex A53 -2GHZ |
|
Android OS |
Android 9.0 | Android 10 (for 4GB RAM+64GB ROM) Android 9.0 (for 2GB RAM+32GB ROM) |
4G LTE compatibility | Not support, NO SIM card slot | Support 4G LTE, with SIM card slot |
Built-in WiFI | YES | |
Screen resolution | 1280*480P & 1920*720P optional | |
RAM / ROM | 2GB/4GB + 32GB/64GB optional | |
Apple Carplay & Android Auto (optional) | Built-in Wired Apple Carplay ( Android Auto) | Built-in Wireless Carplay (Android Auto) |
Support External Wired / Wireless Carplay (Android auto) Dongle Note: Wired connection is better than wireless connection; External connection dongle is better than built-in design. NOT recommend built-in wireless Carplay(android auto) |
The main difference between the PX6 & Qualcomm models are:
1) The Qualcomm model support 4G LTE (PX6 does not have it)
2) The Qualcomm model is with android 10 (PX6 model is android 9.0)
3) In terms of price, the Qualcomm model is about USD20.00 higher than PX6 models.
When we know their difference, then it will be easier to choose it.
A, About the 4G LTE.
1) The 4G function relies on your local 4G network, if the 4G network is not so good in your country,
then no need to choose the Qualcomm model.
2) If your country with a good 4G network, and you also need to use an online map & internet regularly.
you can choose the Qualcomm model
In fact, PX6 models can also use an online map, just connect the android screen to the internet ( by WiFi or hotspot).
Both of them can download the offline map, such as google map (it need to connect to the internet by
Wi-Fi or hotspot before download), you can download map data for your city.
With the offline map, you can use the navigation map even without the 3G/4G internet.
If the map needs to update, just connect to the internet (by WiFi or hotspot) and update it, that is easy!
B, About the Android Version.
Many people are very concerned about the android version and hope to get a higher android version for their unit.
Video Demo (for latest Android 10):
]]>
If you own a BMW equipped with factory-installed navigation, in order to get most out of the BMW navigation system, you need to update the map regularly. Why? Because roads change all the time, new roads are built, old roads are being closed, the road network changes rapidly - up to an average of 15 % ~ 40% each year! For this reason, BMW continuously updates its map data, add more than 140.000 miles of a new road to its maps each year, using a network of more than 50,000 authoritative sources and real-world, real-time feedback from the world’s largest connected navigation community to ensure that its on-board navigation system is the most powerful and accurate on the road!
To keep up to date with your map data, you have to update the map regularly.
Different countries, the cost to update the BMW map is different, usually, one free national map update is available at the dealer. Once the three years are up (or if you want a second national map update sooner), updates cost around $150 - $200 from the dealer. You can contact the dealer to check the cost in detail.
Once more, there are different ways of updating your BMW Navigation system, depending on whether you have a CCC, NBT, CIC, or EVO system. Usually, In addition to the USB stick, an FSC code is required to update your vehicle. Normally, the update process will spend about 30 minutes to 90 minutes.
If your case requires programming may have additional labor charges based upon the software status of the vehicle, you might have some budget on this service!
BMW usually releases up to 3 new versions each year and recommends BMW map update every six months, or annually at the very least. The frequency of new releases strongly depends on the Navi head unit as well as the country.
To update the original BMW map data is one way for navigation service, but today, you have another option! Why not just change your original display to an aftermarket BMW android screen?
As android os car navigation, BMW android screen installed with different types of maps, such as IGO, Sygic, Navitel, Google map, Waze, HERE, Yandex, and so on. With such many different type maps available, you can decide whether to upgrade the maps on your own.
BMW android screen can install thirty-party offline maps, such as iGo map, it just needs to pay a very low cost for the annual update.
If you just use a cracked version, it is no need to upgrade. Or you can use free maps, such as google map, you don’t have to pay extra money each year!
The update process is just quite simple (compare to the original BMW map update):
1, Download latest version of maps, copy them into the internal memory of your car Android navigation
(the root directory is ok)or you can copy it to the SD card.
2. Click Apk installer to start installing.
The rest steps are just the same as you install any other apps on your phone.
The BMW Android navigation support Apple CarPlay and Android auto. Just simply add the Apple Carplay (Android Auto) function, then you will have the navigation apps from your phone to a big BMW android display, it will be ok.
Install a BMW android display will not void the car warranty, because the aftermarket BMW android screen comes with special power harness, they are plug and play, not damage the original car connector, no modification, easy installation.
It keeps all original car functions after replaced with the BMW android screen because it just replaced the factory screen only, the original radio head unit still keeps in the car, thus, all original functions will continue to work the same as before.
Hifimax is professional aftermarket BMW android navigation system solution provider, we offer over 45 different custom made navigation for BMW, It covers almost 90% of BMW Car types, from BMW 1/2/3/4/5/6/7 series and BMW X1/X2/X3/X4/X5/X6 Z4, you can browse our website: hifimaxnavi.com or hifimax.net to visit in details.
]]>First of all, let us take a look at the accessories for the BMW Apple Carplay / Android Auto interface: CP-08 (For NBT model - example)
The accessories including :
1 pcs Carplay/Android Auto interface
1 pcs Power cable
1 pcs USB+RCA
1 pcs Wi-Fi antenna
1 pcs LVDS cable.
This is a wireless Apple Carplay & Android Auto that is custom made for BMW CIC/ NBT/ EVO iDrive versions, support all original BMW car functions, click here
to buy it.
The power harness with male/female connectors, the female connector will connect to the back of the radio head unit; the male connector is connected to the original power harness.
PS: If your car with optical fiber cable, then you need to remove two optical fiber cables to new power harness, click here to read more.
About the original LVDS connection, first, you need to remove the original LVDS
cable from the back of the original screen ( the end of LVDS is connected to radio head unit) and connect this LVDS to "LVDS IN" port in the Carplay / android auto interface.
The aftermarket LVDS cable which we offer have two connectors, one is connected to "LVDS OUT" in the BMW Apple Carplay interface, the other side connects to the
back of the BMW display, please take a look at the photo shown as below.
USB/Wi-Fi antenna connection is simple, just connect it to the BMW Apple Carplay/Android Auto interface box. The Wi-Fi antenna with a 3M sticker, just stick it to the dash inside, then will be fine.
Finally, you need to select the " DIP " for the car model you intend to install.
Many customer ask us for a video demo for the installation, here I would like to recommend a video demo that was made by Bimmer Tech, it is really a professional video.
If any questions or doubts, just feel free to contact us.
]]>
1, Remove the frame for the original radio head unit. 2, Remove the fixing screws for original radio head unit
3, Take out the original radio head unit. 4, Connect the power and test the functions before installation, such as camera, etc
5, Tape the cutting guide paper to the dashboard. 6, Cut the dashboard (make a hole) for android screen
7, Install the bracket for the android screen. 8, Install the android screen
9, Install the iDrive know we offered
11, Power on and test the functions. 12, Test the back view camera
13: Test the factory functions. 14: Done
]]>
Video Demo:
Notice:
Although different car models might be different when removing the car dashboard. The wire connection is the same. The difference is:
1, For the EVO model, the sound work through factory USB, the audio connect in this way: visit here. view video demo.
2, Ignore the LVDS connection if the car without the original screen.
Main functions need to test & verify during installation:
(1) Get into the original menu (Basic - test in priority)
(2) The sound in android mode (Basic - test in priority)
(3) iDrive, steering wheel controls
(4) Bluetooth
(5) GPS signal, Backup camera (if any), etc.
1, Power cable connection
2, LVDS connection (Check this if not access to original menu)
3, GPS antenna, USB, TV/DVR in connection
GPS antenna installation & location, click here.
4, About the middle speaker (for the car with the middle speaker, read this before install)
5, Power cable connection (On the back of factory radio)
6, AUX cable connection ( For CCC/CIC/NBT model, for the EVO model, the audio transfer via USB, visit here)
7, Move the optical fiber cable (For the car with optical fiber cable, important)
8, Rearview camera installation (For aftermarket camera installation)
9, How to choose the car type (Check this if not access to original menu)
10, Rearview camera setting
11, iDrive setting (For the car with CCC system only)
The most regular questions we meet almost every day are :
How original menu shows on the android screen?
Why is no sound in the android menu?
Here is a blog post that will assist you to make a clarification for these two questions, please visit here.
In fact, if you follow the above instructions, there will be no such questions.
This guide covers all aspects of the BMW android screen installation. We hope every installer can read the guide before installation, especially for the hardware connection ( if the car with the middle speaker, optical fiber, aux, etc), if you don't care these, you might need to remove the dashboard again after installation, it is trouble and cost more time on it.
For some problems, sometimes we need you to send us the video or photo for the wire connection. Thus if you met any problems during installation, you should make a video/photo for the wire connection instantly.
> Example NO.1: After you connected the wires, you found the android screen does not show the factory interface, then you should check: LVDS connection (2nd), Car types setting (9th), make video/photo for the LVDS connection, and the " car type" you made in the setting interface.
> Example NO.2: When there is no sound in android mode, you should check :
AUX connection (6th), and check if you have moved the optical fiber cable (7th).
Make a video and send us for these two places before recovering the dashboard.
If the car is EVO model, check if you connect the USB/AUX cables (6th).
make a video for the (6th) & (7th).
Now the question is: How to switch the sound from the AUX to USB, in order to have the sound output ?
Here is the wiring diagram: how to switch the AUX to USB
Another question is: After installed our Android screen, how can I use USB? Because the factory was occupied (as sound switcher).
Yes, after you installed our unit, you can not use factory USB anymore, when you charge the phones or play music/video, you need to use the new USB from our android navigation system.
If your car with AUX (normally the car with CCC, CIC, NBT system), please click here to learning about the AUX connection.
Video Demo
]]>
There are a lot of questions like this every day, so, today I would like to write this article to make clearance for these questions
To answer the questions above, here it needs to make clearance what is the
built-in Carplay, wired Carplay, and wireless Carplay.
So far, only for the BMW Navigation Head units on our website (Model no: BXXX ) can produce with "built-in "Carplay. This is an optional function, the extra cost is USD22.00. it needs to pay the license so that to activate this function.
The model with built-in Carplay will have an APP ( Zlink ) installed in the menu,
also, there is 1 pcs extra USB cable (for Carplay especially) in the accessories box.
For the external Apple Carplay dongle, this is a universal model, it needs to connect the USB when using it, medium-level price, good quality, compared to wireless, the wired connection is better in signal transmission, because it is wire connection.
The price is USD38.00/pcs, but if you order together with our BMW Navigation head unit, it can be USD32.00/pcs and can save the shipping cost.
The wireless Apple Carplay dongle is a new model in the year 2019, for iPhone, you can connect it via Bluetooth(wireless), it also supports the wired connection. But for android phone, when you use Android Auto, it needs to connect by USB.
Price: USD53.00/pcs, this is wholesale price, shipping cost is extra. Different countries, the shipping cost is different, such as the USA, or Europe, the shipping cost is about USD20.00, of course, you can use the coupon or discount code to lower the price. And the best way is to order it together with the car navigation head unit, that way, will no extra shipping cost.
Now back to view the questions mentioned above.
If you still not clear how to use the wired/wireless/built-in Carplay. please take a look the video as below
https://www.youtube.com/watch?v=zB17AQQwIJA&t=382s
The Android Screen navigation GPS system for BMW 2 series F22/ Active Tourer(F45)/ Gran Tourer(F46) (2013-2016), you can order [B202] from our website.
Attention:
1. This product fits for BMW 2 Series F22 / Active Tourer (F45)/Gran Tourer (F46) with an original 6.5 inch or 8-inch screen.
2. This product fits for NBT system with 6 PIN LVDS
1: Before installation 2, Remove the Radio control panel
3: Remove 2 screws and take out the factory radio head unit 4: Remove all cables on the back of factory radio head unit
5: Remove the trim panel 6: Remove the connections on the back of the trim panel
7: Remove 2 screws in the bottom of factory monitor 8: Take off the factory monitor and remove the LVDS Cable from factory head unit
9, Connect our power cable (male) to factory power harness 10, Connect the power cable(female) to factory radio head unit
11, Run the power (for the android head unit) and USB, GPS antenna cable to the back of android screen 12, Connect the power cable/USB/GPS antenna & LVDS cable to our screen and install the android screen.
13, Connect the AUX cable (one side connect to the AUX port in our power cable, another side connect to the port under the armrest box) 14, Recover the central console, and installation is done.
]]>
When you order the aftermarket Android Screen for BMW 1 series E81 E82 E87 E88 (2006-2012), you should you pay attention to below points:
If your car without a factory screen, it means the car just has storage, then you can order [B251], in this case, we offer an iDrive knob.
If your car with factory screen is CCC menu, then order [B261]
while if your factory screen is CIC system, then you should order the [B271]
The factory iDrive knob can work in both the android menu and the factory menu.
PS: If your car doesn't have a storage box (nor factory screen), there is no place to install this model, please Don't order this item.
Installation steps:
1: Remove the trim panel 2, Remove the AC vents
3: Remove the 2 screws in the front of factory monitor 4: Remove the 2 screws on the back of factory monitor
5,The 2 screws on the back of factory monitor showed as below photo 6,Remove the factory monitor (turn to the right and then pull up)
7,Remove the AC control panel 8,Disconnect 2 connections on the back of AC control panel
9: Remove 2 screws and take out the factory radio head unit 10: Remove all cables on the back of factory radio head unit
11: Move two optical fiber cable from the factory harness 12: Insert the 2 optical fiber cable to our power cable (female connector)
13, Connect our power cable (male) to factory harness 14, Connect the power cable (female) to the factory radio and connect all other factory harnesses, then put it back and install the head unit
15, Run the power cable, GPS antenna, USB, RCA cable to the back of our android screen, connect all of them, also connect the LVDS, and can power on the unit, to test if all cables were well connected or not. 16, Install our android screen
]]>
This is the installation guide for Android BMW 7 Series E65 E66 Navigation GPS system, for the details of our android navigation GPS system, please check the [B207]
PS: To install this android screen to your car, the car must equip with AUX-IN port to get sound. If there is no AUX-IN port on your car, you can buy an FM Transmitter from us.
For the BMW 7 Series E65 E66 which does not have AUX, how to install this android screen? There are two ways:
A: Active the AUX-in your car, this is the best way, the BMW service can offer this service.
B. Use an FM stereo Modulator, to switch the Audio signal from the Android Navi head unit to the car speaker directly.
]]>