
OEM Android BMW E60 Navigation Installation - BMW 3/5 series GPS upgrade
This article with below contents:
A, How to replace factory BMW 3 Series (2009-2012), BMW5 (E60) Series (2005-2010) auto radio and CD system with aftermarket navigation Android Screen.
B, When you order the aftermarket Android BMW 3/5 series 2005-2010 Navigation, what should pay attention to before placing an order?
For the BMW 3 /5 series 2009-2012, when the car with factory CIC system, then you should order the [B233] because this model with 4PIN connector that is custom made for the car with CIC system
If your BMW 5 Series E60 (2005-2008), it normally comes with CCC system, the CCC system contains 10PIN LVDS, you should order the [B210] since the B210 contains 10PIN LVDS.
Downlaod the installation wire-diagram (CCC CIC) as below:

Installation steps:
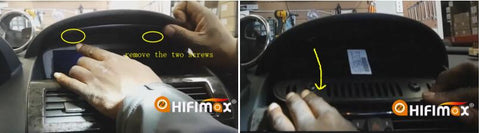
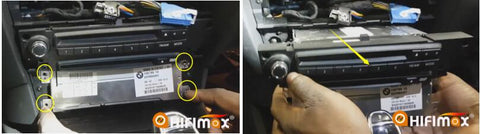
1: Remove two screws on top of the dashboard 2, Pull the monitor down and slide the monitor forward and take it out.
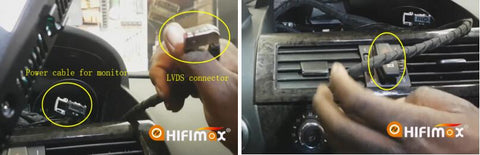
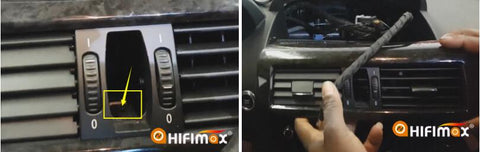
3: Remove 2 connectors on the back of factory monitor(LVDS & The power cable for factory monitor, when you replaced with our android screen, the factory power cable can put aside, no need to connect it) 4: Remove the buttons from the AC outlet panel, please notice, there is a connector inside, don't break it.
5: There is a top screw inside of the panel, when you remove the AC outlet panel, please notice this 6: Pull out the AC outlet panel
7: Remove two screws by the side and take out the AC control panel 8: Remove 3 plugs on the back of AC control panel
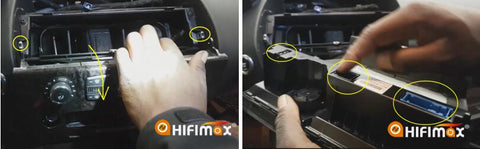
9, Remove 4 screws and slide out the factory radio head unit 10, The radio head unit can slide out (after removed the 4 pcs screws)
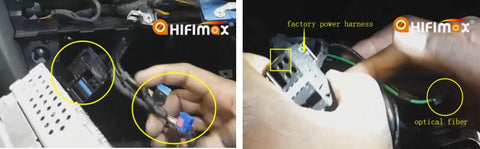
11, Remove all the existing harness on the back of radio head unit 12, Remove the 2 optical fibers from the factory power harness (this two optical cable will move to our power cable (female connector)
13, Wire diagram for the power cable showed as below
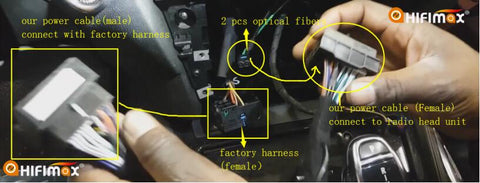
14, Connect our power cable (male) to factory power harness (female) 15, connect 2 optical fibers (which removed from the factory power harness) to our power cable (female)
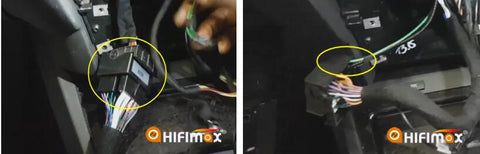
16, connect our power cable (female) & all other harnesses to factory radio head unit 17, Arrange the power cable (for our android screen, the cables go through inner box) up to the back of the android monitor)

18, Connect the power cable/USB cable/GPS antenna, LVDS cable to our android monitor 19, You can location the GPS antenna & USB before Install our android screen to the dashboard
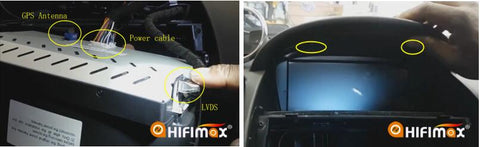
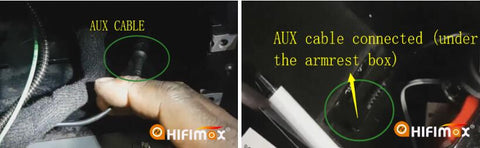
20, Before put back the factory radio unit, please notice to connect the AUX cable, otherwise, it will no sound output 21, The AUX cable will go through the bottom of the central console and one side will connect to the AUX Port under the armrest box
22, After recovering the dashboard, if you find the iDrive not work, then you need to go to the factory menu and set the iDrive as "iDrive_B" 23, The factory patch is Setting/factory setup, input the factory password:1314, then click "OK", then it will go to factory menu
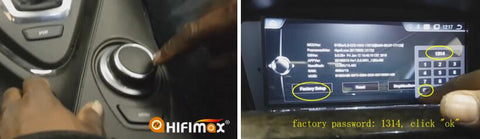
24, Set the "CCC iDrive Type" as "IDrive_B“

Comments
0 comments