
This is Installation manual for BMW X5 X6 E70 E71 Navigation GPS Android Screen replacement
When you order the aftermarket android screen for BMW X5 E70 X6 E71 2007-2014, you should pay attention to check the BMW factory system, to see if the car with CCC or CIC system.
If your car is BMW X5 E70 (2007-2010) X6 E71 (2007-2010)
Original CCC System, you should order [B215]
If your car is BMW X5 E70 (2011-2013) X6 E71 /E72 (2011-2014)
Original CIC System, you should order [B225]
Downlaod the installation wire-diagram (CCC CIC NBT) as below:

How to replace factory BMW X5 E70 X6 E71 with aftermarket navigation Android Screen?
Installation steps:
1: Before installation 2, Remove the AC vents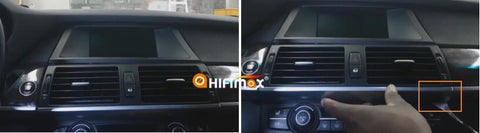
3: Press the button to get the glove box open 4: Removed 3 connections on the back of AC vents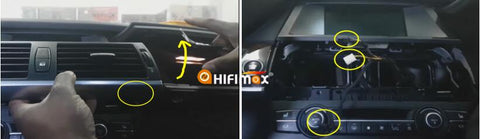
5: Remove 2 screws from the side of monitor at the bottom, then take out the factory monitor 6: Remove the LVDS cable & the power cable for factory monitor (The power cable for factory monitor will no longer use install our android screen)
7: Remove 2 screws showed as below, then remove the AC control panel. 8: Remove the 2 connections on the back of the AC control panel
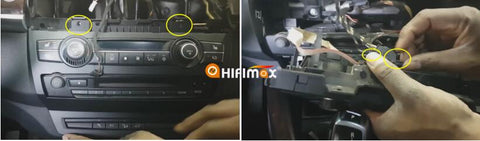
9, Remove 2 screws so that to take off the factory radio head unit 10, Remove all harness on the back of factory radio head unit
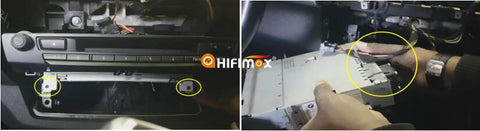
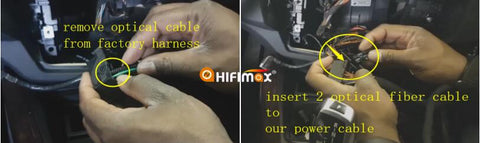
11, Remove the 2 optical fiber cables from factory harness and move it to our power cable (female connector). 12, Insert 2 optical fiber cables to our power cable(male)
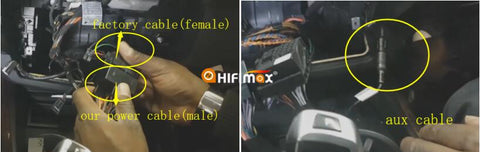
13, Connect our cable (male) to factory power cable(female) 14, Connect the AUX cable, another side of AUX cable inserts into the AUX port under the armrest box
15, If your car with the middle speaker for GPS, then you need to connect below 2 cables to the middle speaker. (if the car without the middle speaker, then no need to connect) 16, The connection of the middle speaker (one is input and one is output)

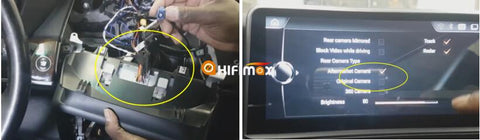
17, Connect all cables to our android screen (power cable/USB/GPS antenna, LVDS cable, etc) 18, After you finish the installation, if you find the camera not work, you can go to the settings/camera video settings, and set the type of your camera: if your camera is factory camera, then choose "original camera", if not, then choose"aftermarket camera"
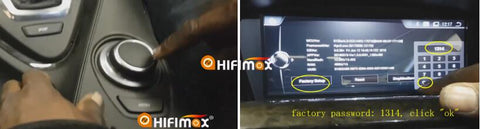
19, After recovering the dashboard, if you find the iDrive not work, then you need to go to the factory menu and set the iDrive as "iDrive_B" 20, The factory patch is: Settings/system info/factory setup, input the factory password:1314, then click "OK", then it will go to factory menu
Comments
0 comments